Crochet Fawn Amigurumi


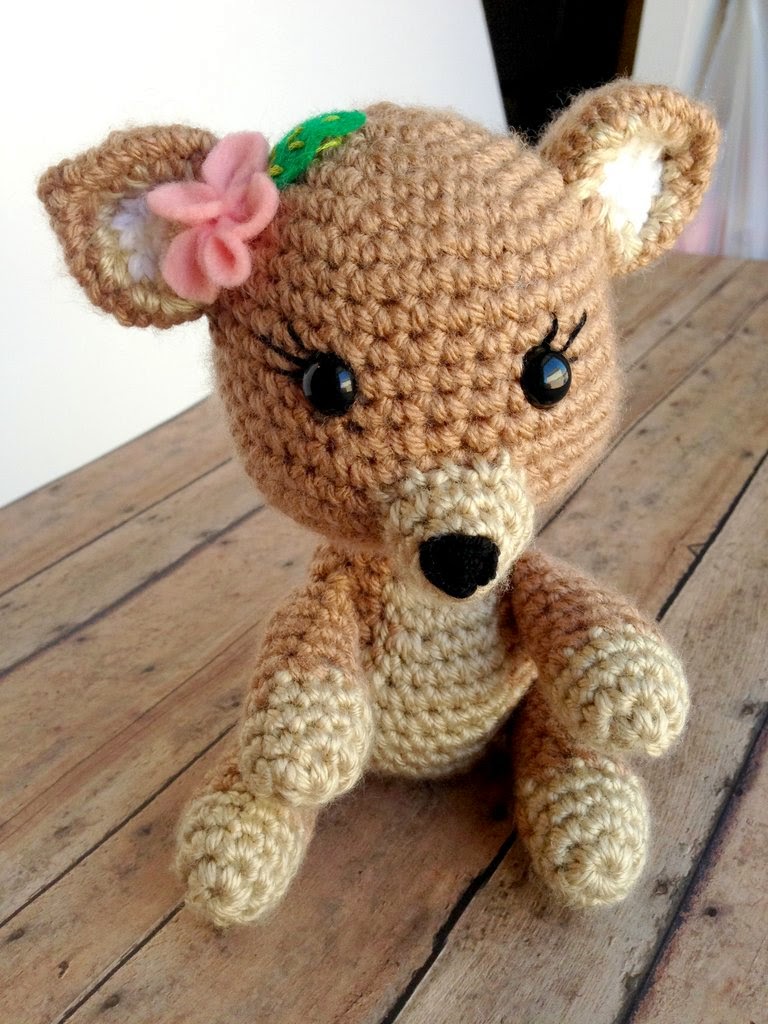
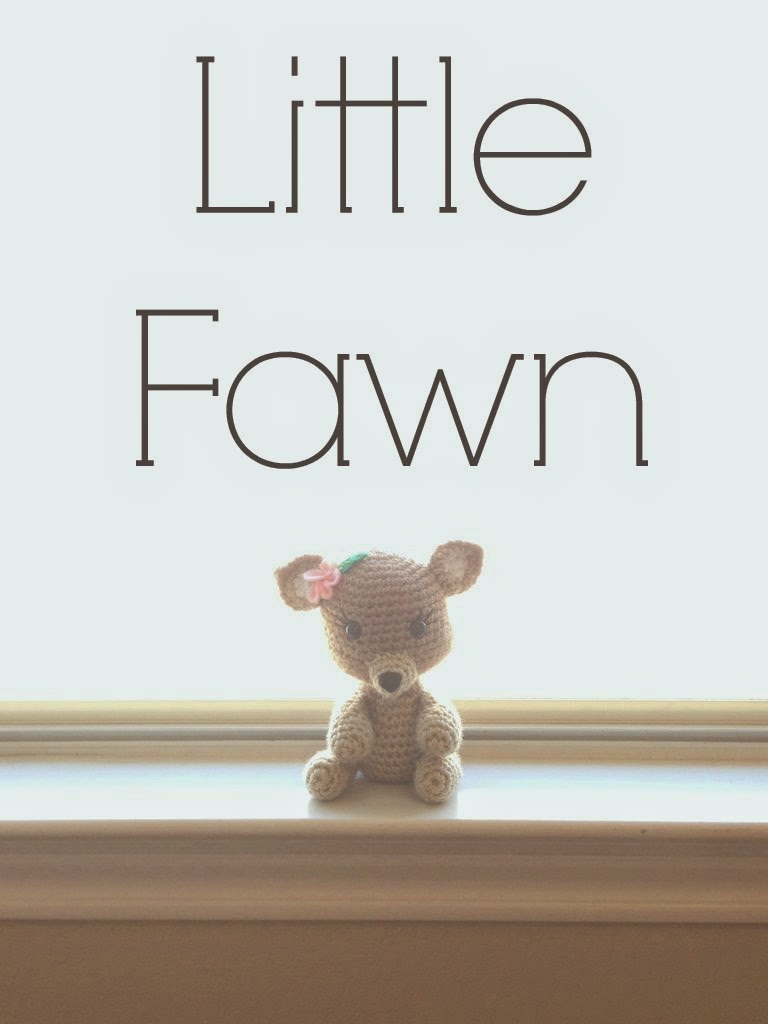
My sweet friend Olivia's baby shower is coming up. One thing I always love to give are crochet gifts! Seriously, who can resist a sweet pair of booties or a fuzzy animal. But scouring the internet for the perfect creature turned up nothing. I was looking for a simple fawn pattern. Something sweet that I could make girly. Nope! Nowhere to be found and definitely not for free! Alas I decided that I would do what I do best and wing it.

I purchased this reindeer pattern from Melichrous on Ravelry. I figured, hey... a reindeer is close, right? I could work with that for sure. You will have to buy the pattern on Ravelry ($4.99) but I have included the steps that I have changed in order to create this little lady!


On the head, body, arms and legs, where the instruction say to use your medium brown, instead use your dark (still light as this is a fawn) brown. NOTE: Use black embroidery floss to create 3 lashes on each eye before adding safety eyes.

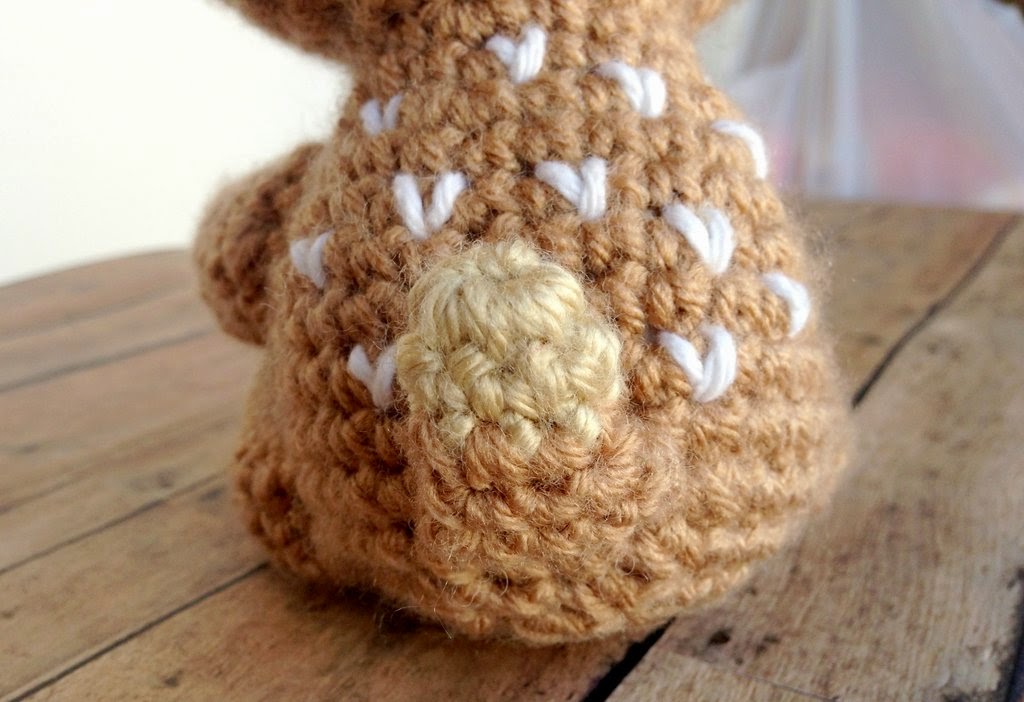
The stomach, nose and hoofs I did in the same color, instead of different colors. This was done in my medium brown

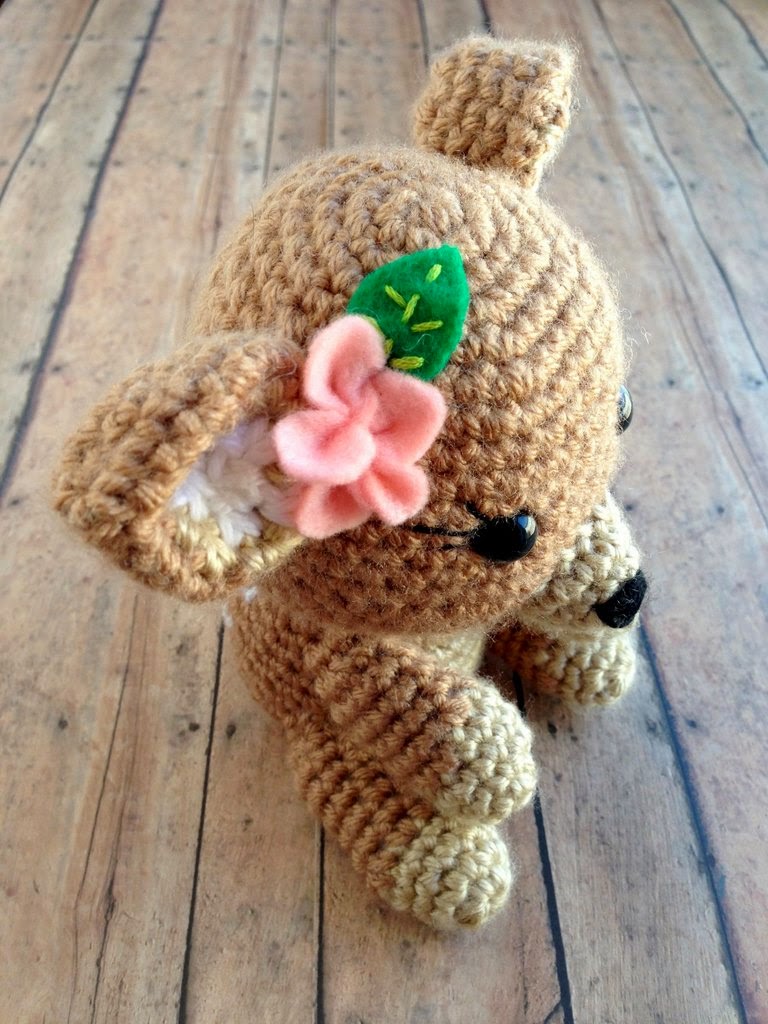
Ears: Start with your dark brown and follow instruction. When it say to switch to "light brown", you will use medium brown instead but ONLY in round 7. The final round you will use your lightest yarn. Complete ear as stated in the instructions.

Tail: I could NOT figure the tail out, it was way too small for me to change colors so often. So instead I followed her directions, but started with my medium brown  for rounds 1 and 2. Then changed to my dark brown for the rest.

Spots: I used my lightest (white) yarn to create the spots. Using a tapestry needle, create little "V"s evenly on back.


Flower: Cut 5 circles out of felt, using a quarter as a template. Using matching embroidery floss (with a knot at the end) and a needle, fold the circles in half and feed onto needle about 1/3 of the way down.


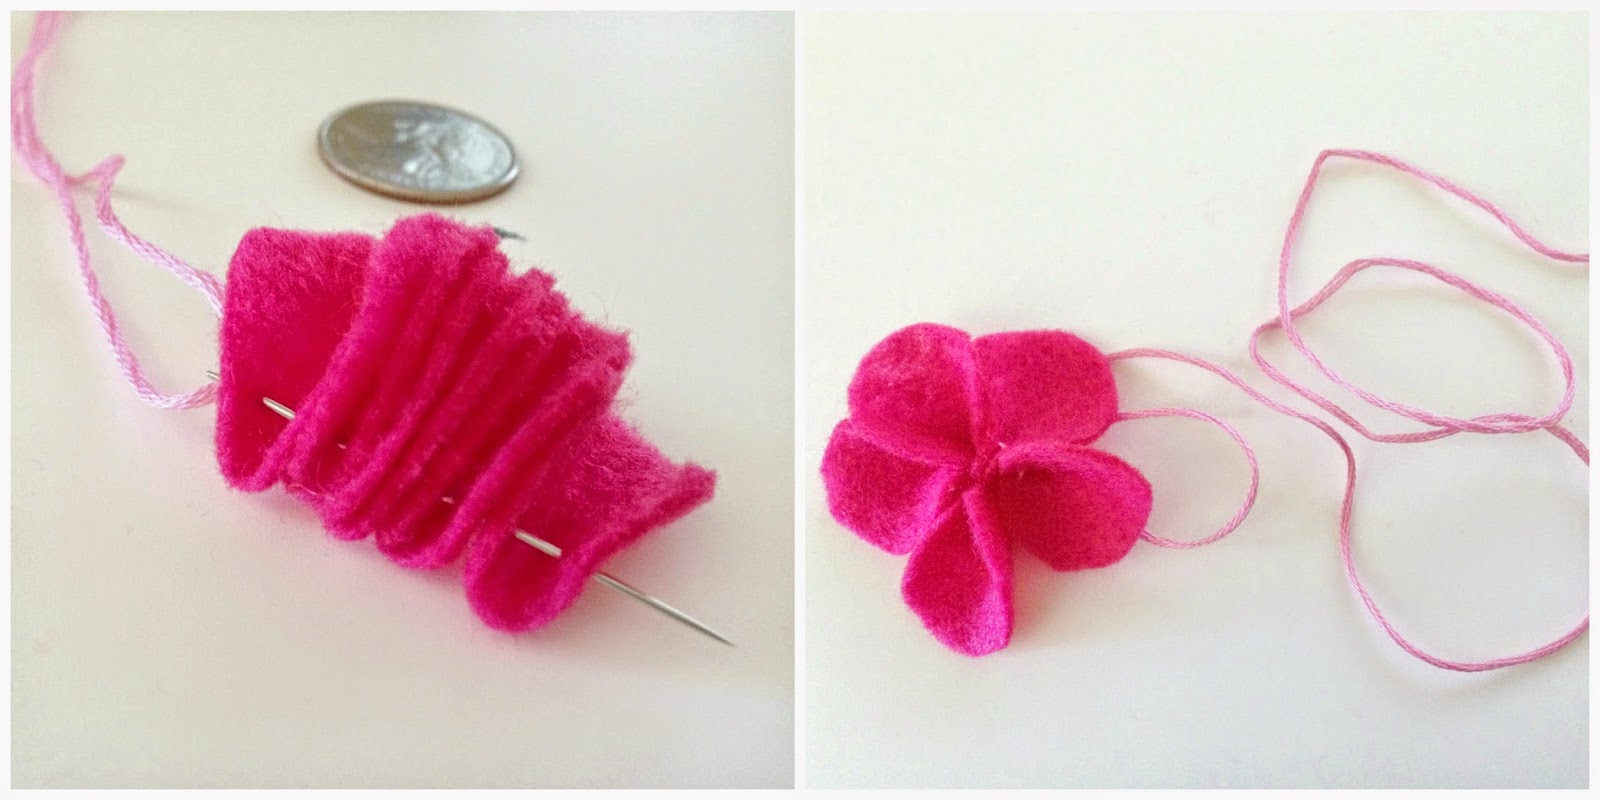
Once all are on the needle push down to your knot. Spread out the petals and run your needle through the first circle to complete and pull tight. Adjust your petals and tie a knot. Leave a good length of the remaining floss to stitch onto your fawn.

Cut a simple leaf shape out of your green felt. I did not have a lighter green felt so instead I used a dark green and light green floss to create the details. For a simple leaf, use a lighter green felt and no details with the floss.

Position flower and leaf on your fawn and hand stitch it down really well. Mine won't even budge I stitched it down so much.

e, voila! A beautiful little fawn!


DIY Ombre dyed duvet Part 1


As you may well know, my obsession with finishing the girls room as become over the top. They are moving into their "big girl" beds this weekend! Either I am crazy, or just impatient. They arent climbing out, they arent unhappy... I just think they would look cute in big beds! Not to mention we bought them these beautiful 4 poster beds off Craigslist (all cheapos say "here!") when they were only 6 months old. So of course I have been DYING to put them together.

I have spent the last month looking for the perfect duvet cover/blanket/quilt/comforter. Seriously there was nothing that stood out in any category. So whats a DIY inclined girl to do? Make one (or two) of course!

I purchased two white cotton duvet covers from Ikea for $14.99 each. I figured at that price I could take a chance on my (crazy) idea to ombre dye them. Now I will be honest, I spent way too much money on this but it is totally my fault. Instead of thinking things through, I like to wing it. In doing so I ended up having to buy way more dye ($2.99 each) than I should have if I just gave it some thought. I am going to share with you my mistakes and explain to you the right way!

Mistake #1: I should have dyed it all in one tub. I watered down the dye too much. As you can see in the first picture the water is pretty transparent. So if you are dying two of these, use one tub with the amount of water shown. And if you are dying one, use half the water you see pictured.

Mistake #2: This caused me to go buy more dye. I originally used two Dylon packets per tub, and it did an okay job but the color just wasn't intense at all. There was an ombre line but it wasn't what I wanted. If you want a good intense color and a strong ombre then I would use 4 for one duvet. I ended up going back to Hobby Lobby and buying two more (that's all they had left) then combining them into one tub and dying the bottom 2/3 again (that's why you only see two colors on the final one). I would have continued to dye the bottom third but my girls were cranky and I was already at my parents 8 hours working on this.


The right way:
1. Wash your duvet. Don't use any fabric softener. Leave damp.
2. Fill you tub with water to about 5 inches for one duvet.
3. Following the direction on your dye packet, add the salt and the dye mixture it asked you to create.
4. Stir it well!
5. Wear gloves (seriously I still have pink hands) and dunk you fabric all the way, keeping track of the TOP of the duvet (the side without buttons).
6. Swish it around for a few minutes until it is light pink (or other chosen color). The lighter the top the more noticeable ombre you will get. This can happen fast so watch out.
7. Pull your material out evenly and let it hang or sit on the grass.
8. Leave the next part in about 15 min or until you like the color.
9. Pull it out some more (if dying an ombre in thirds, this will be the last shade) leave it in until you like the color, or about 30 min if final color.
10. If you are going for one more, pull it out again after about 15 and leave in another 30 min.
11. Carefully wring your fabric out and transfer it to your washer and rinse on cold.
12. Wash on warm and tumble dry!


I plan on dying the bottom third again soon... when I get up the nerve. But for now I am pleased with the outcome! Let me know if you give this a try. I would love to see how yours turns out!!!


Child-proof Door Knob Covers


I have been waiting forever to share this pattern with you! We had clouds for weeks and I couldn't get a good picture.... finally the sun came out!! This is an awesome little pattern that is a great stash buster. It whips up in minutes, which is great if you want to make a bunch (like I did)! These make great baby shower gifts and your friends will be super jealous of all your sweet knobs.

I like my house filled up with color. The walls are brown and since we are renting, I have to put color elsewear. We got a couple of the standard child proof covers a couple months ago but they are bulky, noisy and down right ugly! Not to mention I don't want my daughters to be able to get to the lock. I'm tired of being locked out. I knew there had to be a better solution!

I have included some notes and changes to suit the pattern to your particular knobs.


Child Proof Door Knob Covers:

Size H hook
Worsted weight yarn

NOTE: For a larger knob, dc 9 into magic circle and follow the rest of pattern.
For a shorter knob, change last dc row to a sc row, or remove row altogether.

Round 1: dc 8 into magic circle. Tighten circle, ch2 (8)
Round 2: 2 dc in each st around, ch 2 (16)
Round 3: *2 dc in first st, 1 dc in next* Repeat around, ch2 (24)
Round 4-5: 1 dc in each around (24)

Tie off and weave end into the inside.

To finish:
Cut a length of yarn and weave it through the last row.
Slide cover over knob and tie three tight knots to fasten to knob. Snip ends close to knot.
The cover will feel tight but loosen up as you use it.


Warming up


This weekend the temperature finally hit the 70s! I have been counting down the days since November. The girls were starting to get super cooped up in the house! Not to mention my complexion was looking really sad. So out we went for some fun in the sun (and a tan for mommy)!


Giveaway!

I am having so much fun lately working on new crochet projects. Seriously I think my fingers are going to fall off one day when I go to make a PBJ for the littles. The immense popularity and feedback that I have been getting from my crochet sandals pattern has been enormous and rather humbling! I had no idea that there is an entire crochet cult out there! Its nice to know that I'm not alone.

I wanted to do something special as a thank you for making my pattern and blog a huge success. You deserve it! I am giving away TEN free skeins of yarn from I Love This Cotton! I literally love that yarn, it is so beautiful and so practical. I am dreaming up in my head right now all the possibilities! Below you will find the raffle so please enter and leave a comment telling me what you would crochet (or knit!) with your prize! Make sure you take advantage of all the entry options to give you a better chance of winning! A random winner will be chosen on April 1st (just in time for spring)! Good luck friends!
a Rafflecopter giveaway

A BIG thank you to everyone who entered! You guys rock and I have loved getting to know more about you! If you haven't already, follow me on Twitter and Facebook for more giveaways and free patterns!

Coconut Almond Cupcakes


I am so excited to share with y'all this awesome cupcake recipe! Now, when I say I love to bake, I usually mean bread... but I have been feeling like I really need to venture out of the safe zone and work on my cup-caking skills. After all, I am my mother's daughter! That woman can make anything!

I was inspired by Chobani's #madewithchobani project to create a recipe using yogurt. If you look up that hashtag you will find some awesomeness created by some awesome people. Now when I think yogurt, I can only think of eating it with a spoon. Seriously I have no imagination. But non the less I had to give it a shot. Conveniently enough my friend was having a birthday shindig the other night and thought it best to make some cupcakes and bring them, or else I would eat them all. As I was standing in the dairy isle looking at all the yummy flavors of yogurt made by Chobani, I was drawn to the coconut one! I have had plenty fruity yogurts in my life, but never have I had one that tastes like coconut. And boy have I been missing out!!! All the possibilities came rushing into my head at that moment and I had to go for it.

I can honestly say that these are some of the BEST cupcakes I have even eaten. And my friends agreed! You seriously have to give these a try. The cake is SO moist and more dense than a regular box mix so it doesn't fall apart as you eat it. The icing I used is a classic homemade butter cream (is there anything better?). These are also completely amazing served straight from a night in the fridge... yes... I did have cupcakes for breakfast today. I want to encourage you to create something great with Chobani greek yogurt and join the project!


A sneek peek!


I am so excited about how the girls room is coming together. If you have read some of my more recent posts you can see that I am obsessed with making decorating their room. So much so that I have neglected the rest of my house in order to create the most perfect eclectic balance that I can. I wanted to share a sneak peek picture with ya'll!

I have been searching for a rug for their room forever now. I kept checking Urban Outfitters.com everyday to see if they would add one that I loved and also could afford. That's a near impossible balance to find! But wouldn't you know that I would find the perfect one when I wasn't even looking. I went to world market with a friend to help her find the rug of her dreams when this beauty caught my gaze. It's oh so pretty and colorful. Its called a Chindi rug I think.... Its perfect!

My husband thinks I'm crazy by now. I keep buying artwork every time I'm at hobby lobby then coming home and rearranging the walls. And I'm going to have to move it all again when the girls move into their "big girl" beds. I'm actually really excited about the transition as we bought them four-poster white beds on craigslist when they were 6 mo old and have been dying to put them together! You will have to wait a little longer for the final result!

Like the pillows? You can find the DIY here!